Wednesday, August 22, 2012

Android: Layout Transition CHANGING animation for API level 11-15

In android, Layout Transition is introduced from API level 11. By enabling layout transition application can get predefine platform animations for following changes.


1. APPEARING - animation that runs on those items that are appearing in the container.
2. CHANGE_APPEARING - animation that runs on those items that are changing due to a new item appearing in the container.
3. CHANGE_DISAPPEARING - animation that runs on those items that are changing due to an item disappearing from the container.
4. DISAPPEARING - animation that runs on those items that are disappearing from the container.


These are fast, tested, easy to incorporate with our applications.

CHANGING animation was not added to API at that time, but it has been added now in API level 16.

CHANGING - animation that runs on those items that are changing due to a layout change not caused by items being added to or removed from the container.

So incase if we want to support devices in API level 11, it is good to have some work around, and it should be able to get platform animation in other decides more than API level 16.

I am trying to make a utility for this to simply incorporate this and here I have two options.

1. Simple One time registration/setup, but this will not support scroll changes or any other property changes. only support left, top, right and bottom.

First we register on layout change listener for both layout and its children. So as soon as there is a layout change in these views the callback will be called.


private static void setupChangeAnimationOneTime(final View view) {
...
final View.OnLayoutChangeListener onLayoutChangeListener = new View.OnLayoutChangeListener() {
@Override
public void onLayoutChange(View v, int left, int top, int right,
int bottom, int oldLeft, int oldTop, int oldRight, int oldBottom) {
...

}
};
view.addOnLayoutChangeListener(onLayoutChangeListener);
...
}


Here, create a object animator, with old and new values.


PropertyValuesHolder pvhLeft = PropertyValuesHolder.ofInt("left", oldLeft, left);
PropertyValuesHolder pvhTop = PropertyValuesHolder.ofInt("top", oldTop, top);
PropertyValuesHolder pvhRight = PropertyValuesHolder.ofInt("right", oldRight, right);
PropertyValuesHolder pvhBottom = PropertyValuesHolder.ofInt("bottom", oldBottom, bottom);
ObjectAnimator changeAnimator = ObjectAnimator.ofPropertyValuesHolder((Object)view,
                pvhLeft, pvhTop, pvhRight, pvhBottom);
changeAnimator.setDuration(600);


Start the animator.


changeAnimator.start();


In this option, we don't know other property of the view. so we cannot animate them.

2. Advanced approach, setup in each layout changes, for this the root layout needed to be a custom layout, where the onlayout method should be overridden or need to find a proper action where the layout change is happened (example onClick etc).


First create an animator with properties you wanted animate. Use null for target object and some arbitrary values, which will be changed in setup.


public static ObjectAnimator getDefaultChangeAnimator(){
if(sDefaultChangeAnimator==null){
        PropertyValuesHolder pvhLeft = PropertyValuesHolder.ofInt("left", 0, 1);
        PropertyValuesHolder pvhTop = PropertyValuesHolder.ofInt("top", 0, 1);
        PropertyValuesHolder pvhRight = PropertyValuesHolder.ofInt("right", 0, 1);
        PropertyValuesHolder pvhBottom = PropertyValuesHolder.ofInt("bottom", 0, 1);
        PropertyValuesHolder pvhScrollX = PropertyValuesHolder.ofInt("scrollX", 0, 1);
        PropertyValuesHolder pvhScrollY = PropertyValuesHolder.ofInt("scrollY", 0, 1);
        sDefaultChangeAnimator = ObjectAnimator.ofPropertyValuesHolder((Object)null,
                pvhLeft, pvhTop, pvhRight, pvhBottom, pvhScrollX, pvhScrollY);
        sDefaultChangeAnimator.setDuration(600);
}
return sDefaultChangeAnimator;
}


Now the animator has to be setup just before the layout change of the layout and it's children. First start state will be setup and layout change listener wil be registered.


private static void setupChangeAnimation(final View view) {

changeAnimator.setTarget(view);

changeAnimator.setupStartValues();
final View.OnLayoutChangeListener onLayoutChangeListener = new View.OnLayoutChangeListener() {
@Override
public void onLayoutChange(View v, int left, int top, int right,
int bottom, int oldLeft, int oldTop, int oldRight, int oldBottom) {
...
changeAnimator.setupEndValues();
changeAnimator.start();

};
changeAnimator.addListener(animatorListener);
view.addOnLayoutChangeListener(onLayoutChangeListener);
...
}

after layout change, inside the on layout change callback the end state of the animator will be setup and start immediately.

Here  we need to make sure setupChangeAnimation called just before the layout change. For this we have two possible place,
1. inside the onlayout call of animation enabled layout.
2. posible action code that make layout changes. (example onClick())


public class DemoLinearLayout extends LinearLayout {
...
protected void onLayout(boolean changed, int l, int t, int r, int b) {
LayoutTransitionUtil.checkAndSetupChangeAnimationForAllChild(this);
super.onLayout(changed, l, t, r, b);
}
}


@Override
public void onClick(View view) {
...
LayoutTransitionUtil.setupChangeAnimation((ViewGroup)findViewById(R.id.frm_linear_04));
}


Here I am uploading the sample source code for reference.

Thursday, August 16, 2012

Android: Relative Layout with weighted size

Android applications should support multiple screens, So absolute values cannot be used in layouts. Mostly Relative Layout or Liner Layout is used in UI arrangements, In Relative Layout, views can be arranged relatively. for example one button can be arranged  below  to another etc. But, only in Liner Layout, views' size can be specified with weight. i.e width of a view can be 70% of it parent width etc. This feature is very useful in supporting multiple screens. Since it applies weight in vertically or horizontally at a time normally Liner Layout need to be nested. This may reduce the performance.

So, It is better introducing weight attributes for Relative Layout and will improve application performance. If this can be done in Android API level it is easy since already an implementation is there for Relative Layout. I see this is an enhancement for Relative Layout and no need to introduce another Layout, otherwise same code will be duplicated.

Lets' try this with an example, Say If you want to create a layout as below:

The expectation is as below: setting layout_width=0dip and introducing layout_width_weight and set required value.


<?xml version="1.0" encoding="utf-8"?>
<RelativeLayout xmlns:android="http://schemas.android.com/apk/res/android"
    android:layout_width="match_parent"
    android:layout_height="match_parent" >

    <Button
        android:id="@+id/button01"
        android:layout_width="0dip"
android:layout_width_weight="0.2500"
        android:layout_height="0dip"
android:layout_height_weight="0.1666"
        android:text="Button01" />

    <Button
        android:id="@+id/button02"
        android:layout_width="0dip"
android:layout_width_weight="0.2500"
        android:layout_height="0dip"
android:layout_height_weight="0.1666"
        android:layout_below="@+id/button01"
        android:text="Button02" />

    <Button
        android:id="@+id/button03"
        android:layout_width="0dip"
android:layout_width_weight="0.2500"
        android:layout_height="0dip"
android:layout_height_weight="0.1666"
        android:layout_below="@+id/button02"
        android:text="Button03" />

    <Button
        android:id="@+id/button04"
        android:layout_width="0dip"
android:layout_width_weight="0.5000"
        android:layout_height="0dip"
android:layout_height_weight="0.5000"
        android:layout_centerInParent="true"
        android:text="Button04" />

    <Button
        android:id="@+id/button05"
        android:layout_width="fill_parent"
        android:layout_height="fill_parent"
        android:layout_alignParentRight="true"
        android:layout_below="@id/button04"
        android:text="Button05" />

</RelativeLayout>

I checked for necessary changes in Relative Layout source code and found that,

1. Both fields for holding weight values need to be added in RelativeLayout.LayoutParams class and loading this values into it.
2. new Parameter need  to be added to RelativeLayout.getChildMeasureSpec method inorder to pass the value from RelativeLayout.measureChild and RelativeLayout.measureChildHorizontal methods.
3. Add extra condition if child size equals to zero then make use of the weight value inside RelativeLayout.getChildMeasureSpec to calculate the size.

private int getChildMeasureSpec(..., float weight){
...
 if (childSize == 0) {
     childSpecMode = MeasureSpec.EXACTLY;
     childSpecSize = (int)(mySize*weight);
}else if(chileSize>0){
....
}
...
}

But before going for a Android API level change, It is better to try out. It is impossible since it a private method, it cannot be overridden.

But this methods are called only in onMeasure, So I created a new layout by extending Relative Layout and copy source from Android API for those 4 methods(onMeasure, measureChild, measureChildHorizontal and getChildMeasureSpec), and since these methods use some private/hide methods/field from RelativeLayout and other Android API, I used Java Reflection to access them.

Now, Since weight attributes also not added into API using  those in XML also impossible. But lucky I found that negative values also can be set to layout_width and layout_height and only -1,-2 has used. So I try to use the negative values to indicate those weight values and modify the condition in getChildMeasureSpec according to that.

I found more that, if we set negative px value then childSize will be one less than the value set in XML. Since childSize is integer number and get more precision I go for 10,000 scaled weighted values.

So the layout xml will be like this.


<?xml version="1.0" encoding="utf-8"?>
<demo.widget.WeightedSizeRelativeLayout xmlns:android="http://schemas.android.com/apk/res/android"
    android:layout_width="match_parent"
    android:layout_height="match_parent" >

    <Button
        android:id="@+id/button01"
        android:layout_width="-2501px"
        android:layout_height="-1667px"
        android:text="Button01" />

    <Button
        android:id="@+id/button02"
        android:layout_width="-2501px"
        android:layout_height="-1667px"
        android:layout_below="@+id/button01"
        android:text="Button02" />

    <Button
        android:id="@+id/button03"
        android:layout_width="-2501px"
        android:layout_height="-1667px"
        android:layout_below="@+id/button02"
        android:text="Button03" />

    <Button
        android:id="@+id/button04"
        android:layout_width="-5001px"
        android:layout_height="-5001px"
        android:layout_centerInParent="true"
        android:text="Button04" />

    <Button
        android:id="@+id/button05"
        android:layout_width="fill_parent"
        android:layout_height="fill_parent"
        android:layout_alignParentRight="true"
        android:layout_below="@id/button04"
        android:text="Button05" />

</demo.widget.WeightedSizeRelativeLayout>


and the necessary changes for getChildMeasureSpec method is this:

private int getChildMeasureSpec(...){
........

         if (childSize < -2 ) {
                          // Child wanted an exact size. Give as much as possible
                          childSpecMode = MeasureSpec.EXACTLY;

                          childSpecSize = (int) (mySize*(-1.0f*childSize/10000));
                 
        }else if (childSize >= 0) {
.........

}


I have uploaded both Java and demo xml here.

Let test this and hope necessary implementation for adding weight attribute into Relative Layout Parameter will be added.

Sunday, July 22, 2012

Android: Drawing both side clipped Progress Bar

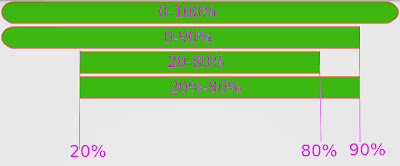
In most of the android application we can see some kind of progress bar with rounded corners as show below. Mostly in media players this used to indicate the curent duration and/or percentage of buffed content etc. These a mostly one side clipped. Let check how we can draw a both side clipped progress bar.


Android API provide a build in progress bar, application developer can make use of this in their development. For that they manly use ClipDrawable. In android, In case of these kind of stretchable background we can use nine-patch drawable those will be stretched in runtime and reduce both memory usage of application.

Assume you have created a nine-patch and added into res folder.

// Lets load the drawable and get it minimum height,
// here I am going to stretch horizontally so i get height.
Drawable drawable = getResources().getDrawable(R.drawable.progress);
int height = drawable.getMinimumHeight();
// If you check, you can identify that the drawable will be NinePatchDrawable.

// First lets examine how this nine patch getting drawn.
// set the boundary and pass the canvas to be drawn. 
drawable.setBounds(0, 0, getWidth(), height);
drawable.draw(canvas);
//this will draw the 0-100% progress bar.


//Now let us try a clipped progress bar.


//Create a clip drawable with above nine-patch, Gravity.LEFT , ClipDrawable.HORIZONTAL  
ClipDrawable clipDrawable1 = new ClipDrawable(drawable, Gravity.LEFT, ClipDrawable.HORIZONTAL);

//Set the level 9000, this will draw the 90% of the left part.
clipDrawable1.setLevel(9000);
clipDrawable1.setBounds(0, height, getWidth(), 2*height);
clipDrawable1.draw(canvas);
//this will draw 0-90%


//Lets create another ClipDrawable which will draw 80% of right part.
ClipDrawable clipDrawable2 = new ClipDrawable(clipDrawable1, Gravity.RIGHT, ClipDrawable.HORIZONTAL);
clipDrawable2.setLevel(8000);
clipDrawable2.setBounds(0, 2*height, getWidth(), 3*height);
clipDrawable2.draw(canvas);
//This draws 20%-80%
//But we expected this should draw 20%-90% progress bar.
//But issue is above clipDrawable2.setLevel(8000) set level of both Drawable.


//So set level of clipDrawable1 again and draw.
clipDrawable1.setLevel(9000);
clipDrawable2.setBounds(0, 3*height, getWidth(), 4*height);
clipDrawable2.draw(canvas);
//This will draw 20%-90% drawable.

Take, we can draw both sided progress bar using clip drawable one inside another, but set Level method will set all children's level, so after setting parent level we have to set chid levels in that order.


Friday, June 29, 2012

Android: Understating Text Drawing

When it comes to draw text inside our custom view, it is difficult to position text vertically in correct place if we use canvas.drawText(..,x,y..) , because it will not start to draw from the give y coordinate rather it will position the text base line in the give y coordinate.

First look at this following image:

In the first view (view 01) text and a red line are drawn in the middle vertically.
         TEXT_PAINT.setColor(Color.WHITE);
        //Drawing the text at middle of the view
canvas.drawText(LONG_STRING, 0, getHeight()/2, TEXT_PAINT);
TEXT_PAINT.setColor(Color.RED);
//Here we draw the middle line
canvas.drawLine(0, getHeight()/2, getWidth(), getHeight()/2, TEXT_PAINT);

If you think that, the text is drawn on top of the line, then simply if we find an API to get the height of the text then we can align use that value.
Rect rect = new Rect();
TEXT_PAINT.setColor(Color.BLUE);
TEXT_PAINT.getTextBounds(LONG_STRING, 0, LONG_STRING.length(), rect);
//Measure the height and draw line on top of text
canvas.drawLine(0, getHeight()/2-rect.height(), getWidth(), getHeight()/2-rect.height(), TEXT_PAINT);

But that is not the case, you see, some part of 'y' from 'Please try this is...' is drawn down of the middle line. So we want to know how actually text are drawn and actual center of the text.


To understand this I used StaticLayout in the second view (view 02).
TEXT_PAINT.setColor(Color.WHITE);
 //Create a static layout to draw 
StaticLayout staticLayout = new StaticLayout(
LONG_STRING, 0, LONG_STRING.length(),
TEXT_PAINT,
                                                 getWidth(),android.text.Layout.Alignment.ALIGN_CENTER , 
1.0f, 1.0f, false);
staticLayout.draw(canvas);


It provides necessary API to get top, bottom and base line of the text. In the second view you can see those lines.
for(int i = 0 ; i < staticLayout.getLineCount();i++){
TEXT_PAINT.setColor(Color.BLUE);
canvas.drawLine(0, staticLayout.getLineTop(i), getWidth(), staticLayout.getLineTop(i), TEXT_PAINT);
TEXT_PAINT.setColor(0x7FFFFFFF&Color.YELLOW);
canvas.drawRect(staticLayout.getLineLeft(i), staticLayout.getLineTop(i), staticLayout.getLineRight(i), staticLayout.getLineBottom(i), TEXT_PAINT);
TEXT_PAINT.setColor(Color.RED);
canvas.drawLine(0, staticLayout.getLineBaseline(i), getWidth(), staticLayout.getLineBaseline(i), TEXT_PAINT);
TEXT_PAINT.setColor(Color.MAGENTA);
canvas.drawLine(0, staticLayout.getLineBottom(i), getWidth(), staticLayout.getLineBottom(i), TEXT_PAINT);
}

Now let use this values to draw text in proper place as shown in view 03.
canvas.drawText(LONG_STRING, 0, getHeight()/2+(staticLayout.getLineBaseline(0)-staticLayout.getLineBottom(0)/2), TEXT_PAINT);


I have uploaded sample source code here:
Thanks


Wednesday, June 27, 2012

Android: Play video on Top of GLSurfaceView


i modified the GLSurfaceViewActivity from ApiDemo to check to see where can play Video on top of GLSurfaceView.


public class GLSurfaceViewActivity extends Activity implements OnClickListener, OnCompletionListener, OnTouchListener {

@SuppressWarnings("unused")
private static final String TAG = "com.example.android.apis.graphics.GLSurfaceViewActivity";

    @Override
    protected void onCreate(Bundle savedInstanceState) {
        super.onCreate(savedInstanceState);

        // Create our Preview view and set it as the content of our
        // Activity
        mGLSurfaceView = new GLSurfaceView(this);
        mGLSurfaceView.setOnTouchListener(this);
        mGLSurfaceView.setRenderer(new CubeRenderer(false));
        FrameLayout frameLayout = new FrameLayout(this);
        frameLayout.addView(mGLSurfaceView, new FrameLayout.LayoutParams(FrameLayout.LayoutParams.FILL_PARENT,FrameLayout.LayoutParams.FILL_PARENT));
       
        mVideoView = new VideoView(this);
        mVideoView.setVisibility(View.INVISIBLE);
        mVideoView.setOnCompletionListener(this);
frameLayout.addView(mVideoView, new FrameLayout.LayoutParams(FrameLayout.LayoutParams.FILL_PARENT,FrameLayout.LayoutParams.FILL_PARENT));
       
        mCheckBox = new CheckBox(this);
        mCheckBox.setText("Load Video");
        mCheckBox.setOnClickListener(this);
frameLayout.addView(mCheckBox, new FrameLayout.LayoutParams(FrameLayout.LayoutParams.WRAP_CONTENT,FrameLayout.LayoutParams.WRAP_CONTENT,Gravity.CENTER));
        setContentView(frameLayout);
    }

    @Override
    protected void onResume() {
        // Ideally a game should implement onResume() and onPause()
        // to take appropriate action when the activity looses focus
        super.onResume();
        mGLSurfaceView.onResume();
    }

    @Override
    protected void onPause() {
        // Ideally a game should implement onResume() and onPause()
        // to take appropriate action when the activity looses focus
        super.onPause();
        mGLSurfaceView.onPause();
    }

    private GLSurfaceView mGLSurfaceView;
private VideoView mVideoView;
private CheckBox mCheckBox;

@Override
public void onClick(View arg0) {
if(mCheckBox.isChecked()){
Intent intent = new Intent(Intent.ACTION_GET_CONTENT);
intent.setType("video/*");
startActivityForResult(Intent.createChooser(intent, "Chose a Video"), 10);
}else{
mVideoView.setVisibility(View.VISIBLE);
mVideoView.start();
mCheckBox.setChecked(true);
}

}

@Override
protected void onActivityResult(int requestCode, int resultCode, Intent data) {
if(data!=null && data.getData()!=null){
mCheckBox.setText("Play Video");
mVideoView.setVideoURI(data.getData());
mVideoView.setVisibility(View.VISIBLE);
mVideoView.start();
}else{
mCheckBox.setChecked(false);
}
super.onActivityResult(requestCode, resultCode, data);
}

@Override
public void onCompletion(MediaPlayer arg0) {
mVideoView.setVisibility(View.INVISIBLE);

}

@Override
public boolean onTouch(View view, MotionEvent motionEvent) {
mVideoView.setTranslationX(motionEvent.getX());
mVideoView.setTranslationY(motionEvent.getY());
return true;
}
}


Tuesday, June 26, 2012

Logging Caller Method Info in Java

In our application, one method maybe called from multiple locations. While debugging application we may need to log it caller caller method information in those case following line will be use full.
Here from the current thread, I get called Stack and print that for us.


private static void someMethod() {
System.out.println(Thread.currentThread().getStackTrace()[0]);
System.out.println(Thread.currentThread().getStackTrace()[1]);
System.out.println(Thread.currentThread().getStackTrace()[2]);
}


java.lang.Thread.getStackTrace(Thread.java:1479)
demo.TestThread.someMethod(TestThread.java:14)
demo.TestThread.main(TestThread.java:9)

What we want from this output is "demo.TestThread.main(TestThread.java:9)" So you use in your java application.

System.out.println(Thread.currentThread().getStackTrace()[2]);  


Okey for Android Application I try followings:

public void onCreate(Bundle savedInstanceState) {
..................

        Log.i(TAG, "::onCreate:" +Thread.currentThread().getStackTrace()[0]);
        Log.i(TAG, "::onCreate:" +Thread.currentThread().getStackTrace()[1]);
        Log.i(TAG, "::onCreate:" +Thread.currentThread().getStackTrace()[2]);
        Log.i(TAG, "::onCreate:" +Thread.currentThread().getStackTrace()[3]);

............
}


onCreate:dalvik.system.VMStack.getThreadStackTrace(Native Method)
onCreate:java.lang.Thread.getStackTrace(Thread.java:591)
onCreate:demo.multi.line.text.DemoMultiLineTextActivity.onCreate(DemoMultiLineTextActivity.java:58)
onCreate:android.app.Activity.performCreate(Activity.java:4518)


What we want from this output is "onCreate:android.app.Activity.performCreate(Activity.java:4518)" So you use in your Android application:

        Log.i(TAG, "::onCreate:" +Thread.currentThread().getStackTrace()[3]);


Friday, June 22, 2012

Android: Bigger Image for any of the Image inside Grid View

As and extension for my earlier post, I have created the project to apply for any of the image in the grid and it will support for any number of columns and the bigger image and can take any number of column with.


I have uploaded the source code here:  http://dl.dropbox.com/u/7717254/DemoGridView_02.zip

But if you have bigger image column size if greater than half of the grid column size it has some bug, and need to fix that first.